How To Disconnect Collar Pin? A Step-by-step Removal Guide
Disconnecting a collar pin is a practical task that saves time and protects fabric. With the right tools and a calm approach, you can remove most collar pins without professional help. This guide covers pin types, safe removal steps, common problems, and aftercare so you can finish in under 20 minutes.
Collar pin removal is straightforward: grip the pin head with needle-nose pliers, stabilize the collar, and pull straight out. Most jobs take 5-15 minutes, depending on pin type; twisting or forcing the pin risks fabric damage. If a locking cap exists, release it first with a small flat-head screwdriver.
Key Takeaways
- Identify pin type. Straight pins pull out with pliers; screw-in pins require a screwdriver; locking caps need a release tool.
- Stabilize collar first. Keep the fabric flat to prevent slips and tearing during removal.
- Use proper tools. Needle-nose pliers or a tiny screwdriver prevent pin damage.
- Pull straight out. Angled removal widens holes and can ruin the collar.
- Inspect after removal. Check for fraying or distortion and adjust as needed.
- Address resistance safely. If the pin won’t budge, stop and reassess to avoid fabric damage.
Understanding Collar Pins

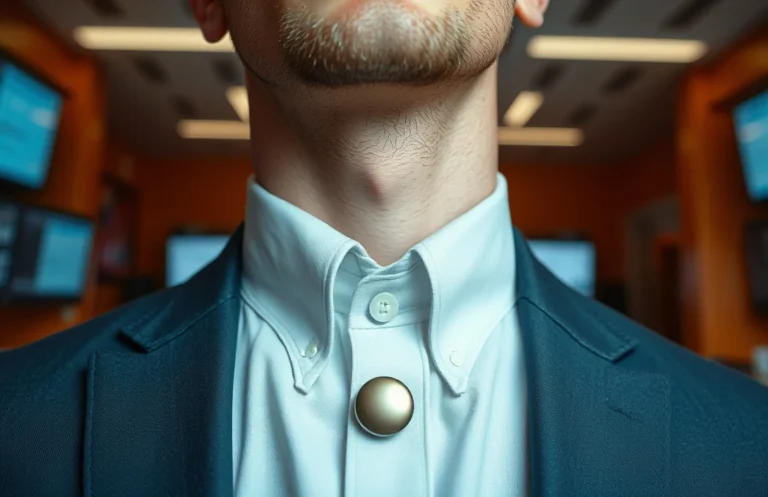
A collar pin is a small fastener that secures the points of a dress shirt collar or a detachable collar. It passes through two tiny holes near the collar tips and is held in place by a head or locking cap. You’ll remove it when replacing the collar, cleaning, or repairing fabric. Removing a collar pin requires care to preserve both the fabric integrity and the collar’s original shape.
Many shirts feature a simple straight pin that slides out with gentle traction. Others have a locking cap or screw mechanism that must be released or unscrewed before removal. If you’re working with a vintage or delicate collar, you may see fraying around the holes after removal, so a careful hand and good lighting are essential. Aim for a clean, direct path for the pin to exit without snagging thread or weave.
You typically remove a collar pin when swapping to a different style, cleaning behind the pin, or repairing wear at the collar tips. If you’re uncomfortable removing the pin or notice stress at the holes, consult a professional tailor. Protect the fabric by supporting the underside with a thimble-like aid or a folded cloth as you work.
Essential Tools and Safety
A compact toolkit ensures a smooth and predictable process. Control and visibility are crucial, not brute force. Gather these items before starting: needle-nose pliers, a small flat-head screwdriver, precision tweezers, a bright desk lamp or headlamp, and a clean, flat workspace. Small scissors or a seam ripper can be handy for trimming loose threads after removal.
Safety means stabilizing the collar, protecting the fabric, and keeping fingers away from pin jaws. Work on a hard surface with the collar laid flat. If the pin is near delicate embroidery, place a soft cloth beneath to cushion any slips. A magnifier can help see a tiny locking cap or screw head, especially on well-made or vintage pieces.
Step-by-Step Removal Guide

Identify the pin type first, then stabilize the collar. A steady grip prevents slips that could tear fabric. Ensure you have proper lighting to see holes and any caps. Follow these steps to remove the pin safely and cleanly.
- Step 1: If there’s a locking cap, slide a small flat-head screwdriver under it to release. Hold the collar so the pin sits vertical to minimize fabric strain.
- Step 2: For screw-in pins, place the screwdriver in the slot and turn counterclockwise until the pin backs out. Gentle rotation yields a clean exit.
- Step 3: For straight pins, grip the head with needle-nose pliers and apply steady, straight traction. Keep the pin aligned with its axis to avoid enlarging the holes.
- Step 4: If the pin won’t move, stop and reassess. Check for subtle damage, such as a bent head or a mismatched cap that binds.
- Step 5: Once the pin starts to move, ease it out slowly. If the collar shifts, reposition your grip and continue to pull straight out.
- Step 6: After removal, inspect the holes for signs of wear. Trim any loose threads and consider a light touch with fabric glue only if recommended by the garment care instructions.
- Step 7: Store the pin in a small container or magnetic tray to prevent it from rolling away. Return the collar to its original position or set it aside for cleaning or replacement.
You may encounter a decorative cap or a tight cap requiring extra care. A tiny lock release tool or micro-flat-head screwdriver can help pop off the cap without bending the pin. If the pin is stubborn, take a breath, recheck alignment, and try again with a fresh, steady grip.
Variations by Collar Type
Detachable shirt collars often use pins that sit flush with the collar points. Some collars employ a more robust pin and locking cap system for a formal look. The approach changes with the design, but the core rule stays the same: stabilize, identify the mechanism, and remove with minimal force.
You’ll see four common variants: straight head pins, screw-in pins, locking cap pins, and decorative cap pins. Straight head pins are the simplest to remove, while screw-in pins require a screwdriver. Locking caps add a small release action, and decorative cap pins may require a precise grip to release the head. Each type carries its own risks regarding potential fabric damage if rushed.
Table: Pin Variations, How They Work, and Best Use
- Name: Straight head pin
How it works: A simple pin with a head that sits on the outside; slides out when pulled.
Pros: Quick release; minimal tooling needed.
Best for: Standard detachable collars.
- Name: Locking cap pin
How it works: Cap locks the pin in place; a small release tool opens the cap.
Pros: Reduces accidental detachment.
Best for: Formal wear needing extra security.
- Name: Screw-in pin
How it works: Threads engage with a threaded hole; unscrew to remove.
Pros: Very secure; resists accidental removal.
Best for: High-end collars and dress shirts.
- Name: Decorative cap pin
How it works: Cap provides a decorative finish and a secondary grip point.
Pros: Aesthetically pleasing; controlled release.
Best for: Fashion collars with visible pins.
Common Mistakes and How to Avoid Them

Pulling the pin at an angle breaks threads, enlarges holes, or tears the fabric. Align the tool with the pin’s axis and apply steady pressure. Ignoring a locking cap or screw head leads to frustration and potential pin damage.
Don’t rush in cramped spaces. A tiny collar point is easy to slip and poke the fabric. Use good lighting and consider laying a soft cloth under the collar to cushion any misstep. If you encounter resistance, pause and check the pin type. Patience and a controlled release always beat force.
Troubleshooting and Safety
If the pin won’t budge, verify you’re using the correct tool for the pin type. A screwdriver for a screw-in pin, a small flat-head for a locking cap, and pliers for a straight pin are necessary. Examine the area around the holes for fabric distortion or thread pulling. Take your time; slow and steady wins the day.
If a cap or head is bent, you can often straighten it with gentle pressure from pliers or tweezers. Do not force the pin, as that can create larger holes or tear the fabric. When in doubt, photograph the pin and consult a tailor for guidance on whether to replace the collar or preserve it with professional removal.
Maintenance and Aftercare
After removal, inspect the holes for small frays or loose threads. Trim any shedding fibers with small scissors and gently press the area with a clean cloth. If the collar is machine washed, wait until it dries completely before reassembling with a new pin. For delicate fabrics, consider a fabric patch or reinforcement behind the holes to prevent further wear.
Regular checks prevent progressive damage. If the collar is part of a suit or formal ensemble, reserve a spare pin for future use. Store pins in a dedicated box, separated by type, to speed up future maintenance. A quick inventory every few months keeps your wardrobe ready for quick adjustments.
When to Seek Professional Help
Consult a tailor if the pin is embedded, severely bent, or the fabric shows significant wear around the hole. A professional can remove the pin with minimal damage and assess whether the collar or shirt needs reinforcement. For vintage or high-value pieces, professional care ensures the collar retains its original shape and value.
If you’re unsure about the best removal method for delicate fabric, take the garment to a tailor. They can recommend a pin replacement or an alternative system that preserves appearance while maintaining functionality. When in doubt, seek professional help before attempting aggressive removal.
Next Actions
Prepare your toolkit, lay the collar flat, and identify the pin type. If you’re replacing a pin, choose a variant that matches the collar’s style and fabric. Finally, test the process on a less-visible area or a spare collar to refine your technique before touching the main garment.
FAQ
Q1: Can I remove a collar pin myself, or should I always go to a tailor?
A1: You can remove most collar pins yourself with the right tools and care. If the fabric is delicate or the pin is damaged, a tailor is safer. Proper tools and a calm approach minimize risk.
Q2: How long does it typically take to disconnect a collar pin?
A2: Most removals take 5-15 minutes, depending on pin type and collar complexity. Time varies based on locking mechanisms and fabric stiffness.
Q3: What’s the safest way to handle a locking cap pin?
A3: Release the cap with a small flat-head screwdriver before applying any pull. Direct cap release prevents cap damage.
Q4: What mistakes should I avoid during removal?
A4: Don’t yank or pull at an angle. Don’t force a pin that won’t move; reassess the pin type and tool choice. Avoid fabric tears and hole enlargement.
Q5: Are there alternatives to using a pin for collars?
A5: Yes. Consider a snap, a button-down solution, or a different pin style that requires less handling. Alternative methods can reduce future wear.