
How To Put In A Collar Pin? In 8 Easy Steps
Collar pins add a crisp, vintage edge to a dress shirt, and placement matters. A proper pin keeps the collar aligned, prevents the two layers from shifting, and avoids pulling at the fabric around the knot. If you want to know how to put in a collar pin, this guide covers prerequisites, steps, examples, troubleshooting, and practical next actions so you can pin with confidence.
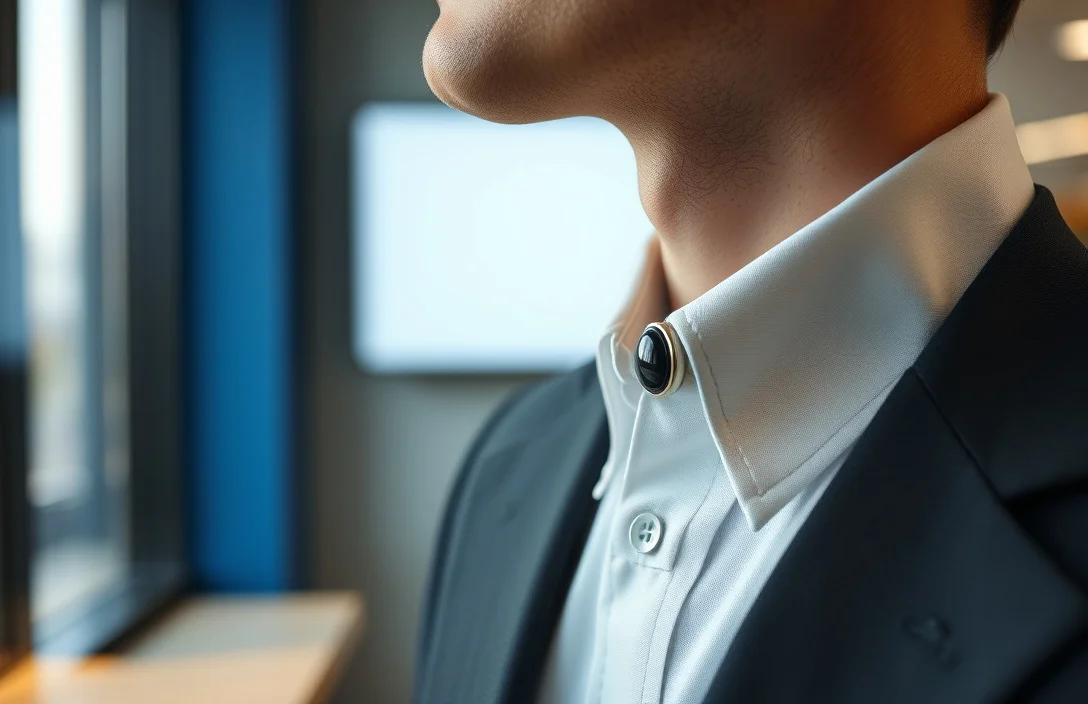
Collar pin placement is straightforward: insert the pin through both collar layers, between the collar tips, about a 1/4 inch above the seam. Use a pin that is long enough to span both layers without sticking out, and keep the decorative head centered on the outside. With clean, ironed shirts, this holds the collars evenly and reduces fabric creep.
- Placement matters. Insert the pin between the two collar layers, level with the neck seam.
- Pin length matters. Choose a length that spans both collars without protruding.
- Threading technique: go in one smooth motion to avoid fabric bunching.
- Visibility check: the decorative head sits centered on the outside.
- Alternate approach: if the collar is stiff, consider a shorter pin or a locking style to reduce movement.
What a collar pin is and when to wear it
A collar pin is a small metal accessory that secures the two collar layers together, typically sitting just above the shirt’s seam line. It creates a clean, elevated line along the collar and holds the points closer to the neck so the shirt behaves as a single, sharp plane. The look works best with traditional or semi-spread collars and with shirts that have a clean, unbroken collar edge.
Wear it for formal or semi-formal events, or when you want a tie-free, minimalist profile under a suit jacket. It’s less common in casual outfits, where a collar pin can feel fussy or out of place. If your shirt fabric wrinkles easily, a collar pin can also help you maintain a tidy silhouette through the evening. In practice, you’ll get the best results on shirts with stable, non-bulky fabrics and collars that aren’t excessively stiff or prone to crumpling.
Before you try it, verify that your collar has two layers that you can pass a pin through. The pin shouldn’t be so long that it protrudes beyond the outer edge of the collar. And you’ll want a shirt with a collar that has a defined seam and enough room between the two layers to avoid pressing on button plackets or the knot area. In the right setup, the effect is deliberate and restrained rather than gimmicky.
Tools and materials you’ll need
You should have a clean, ironed shirt and a collar pin that matches your collar type. The goal is a smooth, controlled insertion without snagging the fabric or bending the pin. If you don’t own a collar pin yet, start with a basic, non-locking straight pin and a simple, polished head so it looks intentional rather than makeshift.
You’ll want these basics on hand: a clean mirror for alignment, a small pair of forceps or tweezers for precise threading if needed, and a clean cloth to wipe off any dust or oils. A soft seam roller or a pressing cloth can help flatten the collar edge before you insert the pin. Finally, have a backup pin in case you need to replace one that bends during insertion. In practice, this setup keeps the process smooth from the first attempt.
A practical checklist keeps you from missing steps:
- Clean, ironed shirt with a crisp collar
- Collar pin sized for your collar width
- Small forceps or tweezers for precise threading
- Mirror for alignment, plus a clean cloth for the collar surface
- Backup pin and a small, safe storage pouch
Fit and sizing basics
Collar width and the distance between collar points determine whether a collar pin will sit comfortably. Wider collars can accommodate longer pins that span both layers without protruding. Narrow, slim collars require shorter pins to prevent excess bulk at the points. If you’re unsure, choose a pin that ends just shy of the outer edge of each collar when viewed from the front.
The goal is a pin that anchors the two layers without distorting the collar’s shape or pulling at the fabric when you move. If the pin is too long, it can press into the shirt and cause creasing or discomfort at the back of the neck. If it’s too short, the collar can shift and lose the intended clean line. Your best bet is to measure the distance between the inside edges of the two collar layers and use a pin that covers that span with a small margin.
Another sizing tip: check the thickness of the collar stack. A thick, multi-layer collar requires a pin with a bit more length to pass cleanly through all layers. If you’re wearing a tie, ensure the pin sits above the knot area and not directly over it. In practice, test a dry run on a spare shirt or a mirror to confirm that the pin sits flush and doesn’t cause binding when you nod or turn your head.
how to insert a collar pin
- Prepare the shirt. Iron the collar flat and ensure both layers lie evenly with no folds or creases.
- Align the collar. Stand in front of a mirror and position the collar so the tips are symmetrical and the neck seam is centered.
- Place the pin. Hold the pin parallel to the collar edge so the decorative head will show on the outside.
- Insert through the top layer. Gently push the pin through the outer collar layer at the chosen position, using a steady hand.
- Pass through the bottom layer. Continue the same motion to pass the pin through the inner collar layer while keeping pressure even.
- Check alignment. The head should sit on the outside, centered above the seam, with the pin running straight and not wiggling.
- Final adjustments. If the pin sits high or crooked, remove it slowly and reinsert, maintaining a smooth, single motion.
- Test movement. Turn your head and smile; the pin should stay in place without lifting the collar or pulling at the fabric.
For example, a well-placed pin sits between the two collar layers, about a quarter inch above the seam, with the decorative head visible and centered. In practice, this position is subtle but unmistakable and helps keep the collar from shifting during the day. If you notice the collar creeping or the pin bending, reinsert it with a cleaner path and a steadier hand.
Common mistakes and how to fix them

Mistakes tend to be about control and alignment. A rushed insert leaves fabric caught on the pin or a crooked head. A misaligned pin can create an uneven collar line that draws attention for the wrong reasons. When the pin is too long, you’ll feel a poke at the back of the neck or see the pin tip peeking through the bottom layer.
If you catch a snag, stop and remove the pin carefully. Reinsert using a slightly different angle, ensuring you pass cleanly through both layers in one smooth motion. If the collar is stiff or the fabric folds, use a light press with a pressing cloth to re-flatten the edge before the next attempt. Avoid forcing the pin through any area that resists; a forced pass can bend the pin and damage the fabric.
Styling tips and variations
A collar pin works best with a clean, understated shirt and a well-fitted suit. Reserve it for shirts with solid, smooth fabrics where the pin can sit flush and the head remains visible. For a more modern take, pair a minimal, metallic pin with a simple, matte tie and a slimmer tie knot to maintain balance.
If you experiment with different looks, consider the pin’s finish. A bright polished head reads more formal, while a matte or brushed metal is subtler. For very formal events, ensure the rest of your accessories – belt buckle, cufflinks, and watch – have a cohesive metal tone. In practice, the pin is a quiet enhancement rather than the centerpiece, so keep the rest of the outfit in harmony.
Maintenance and care
Wipe the collar and pin after wear to remove oils from fingers and skin. If the pin becomes slightly tarnished, a quick clean with a soft cloth and a tiny amount of metal cleaner is usually enough, followed by another wipe to remove any residue. Store pins in a small case or pouch to prevent bending or scratching. Avoid dropping pins on hard surfaces, which can nick the head or bend the shaft.
Regular inspection helps. Look for bent tips, loosened heads, or signs that the pin no longer passes easily through the collar layers. If any part seems weakened, replace the pin rather than forcing it through fabric. In practice, a little care extends the life of both the pin and the shirt.
Troubleshooting common issues
If the pin slips during wear, reinsert with a longer, straighter path and recheck your alignment in a mirror. A pin that consistently slips may be too long for your collar or too thin for the fabric. If the collar shows signs of puckering around the pin site, reduce the force you apply and ensure the motion is a single, clean pass. For snagging, slow down, lay the collar flat, and guide the pin through with forceps or fingers that are not oily.
If you’re unable to pass the pin through due to thickness, back off to a shorter pin or a different style designed for thicker fabrics. An alternative approach is to use a locking collar pin that remains fixed in place once inserted, reducing shifting across movement. In practice, switch styles only after confirming that your shirt and collar will tolerate the alteration without compromising comfort.
Quick-start checklist
- Clean, ironed shirt with a crisp collar
- Collar pin sized for your collar width
- Mirror, optional forceps for precision
- Backup pin in case of bending
- Gentle, straight insertion with even pressure
The practical verdict and next steps
A collar pin is a small accessory, but it changes how your shirt sits and reads. With the right shirt, the right pin length, and a deliberate insertion path, you gain a clean, controlled silhouette that lasts from the first coffee sip to the last toast. Start with a basic, non-extreme pin on a shirt you’re comfortable wearing, then adjust for fit and fabric as you build confidence.
FAQ
Can I wear a collar pin with any shirt?
A collar pin works best on shirts with two distinct collar layers and a stable fabric. If the collar creases easily or the shirt is very flexible, the pin can create puckering or shifting. For most standard dress shirts, a sharp, finite pin is ideal.
How much does a collar pin cost?
Most collar pins range from around $10 to $40 depending on material (stainless steel, brass, or higher-end metals) and finish. If you wear pins regularly, investing in a polished, corrosion-resistant option pays off over time.
How do I remove a collar pin safely?
Gently push the pin back through the collar from inside out, keeping the outside head steady. If the pin is stubborn, use forceps to grip near the head and steady your hand while pulling back. Avoid yanking to prevent fabric damage.
What causes a collar pin to bend or snag?
A bent pin usually results from forcing it through thick fabric or twisting the wrist during insertion. Snags come from sharp edges on the collar or a pin with a rough head. Use smooth, straight motions and a pin that suits your collar thickness.
Are there alternatives if I can’t wear a collar pin?
Yes. A collar stay or a subtle collar clip can keep collars neat without penetrating both layers. If you prefer a minimal approach, skip the pin and rely on a well-pressed collar and a properly tied knot to maintain the look.