How To Wear Collar Pins? A Step-by-step Guide For Style
how to wear them effectively

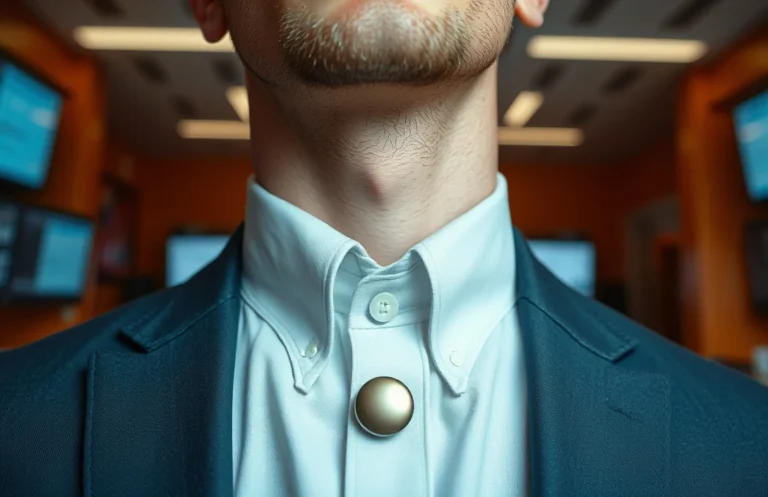
Collar pins create a crisp collar line with a clean, vintage edge. They require a shirt with small, aligned holes near the collar tips and a steady hand, but the payoff is a collar that sits neatly around the knot. For understated polish without shouting, collar pins are reliable.
Collar pins pass through two holes near the collar tips, sit flush against the fabric, and lift the collar by about 2-4 mm. A back stopper or cap keeps the pin from sliding, and symmetry on both sides matters. Start with a shirt that has properly placed holes and a collar you can shape confidently.
Key Takeaways
- Right shirt required. Only shirts with holes near the collar tips take a collar pin securely.
- Symmetry matters. Align holes at the same height on both sides for balanced lines.
- Lift amount is small. Expect a lift of about 2-4 mm to keep the look natural.
- Back support helps. Use a back stopper or cap to prevent slipping during wear.
- Pair thoughtfully. Best with a medium to slim tie knot and a clean, minimal look.
- Practice first. Try on an old shirt to dial in height and comfort before wearing it out.
What collar pins are and when to wear them
Collar pins are small devices that pass through two holes near the tips of a dress shirt to hold the collar together and lift its line. They’re most effective on crisp, well-pressed shirts with collars that can accommodate the holes without distorting the fabric. The effect is a raised collar with a defined, sharp silhouette around the tie knot. They work best for formal or semi-formal looks where you want a clean vertical edge that doesn’t rely on bulky tie knots to read as deliberate.
In practice, collar pins lend a vintage edge to a modern outfit. They pair well with classic charcoal, navy, and charcoal gray suits and with ties that are lean and tidy. They’re less forgiving on shirts with flimsy collars or if the holes sit unevenly, which can tilt the line and make the look feel forced. If you’re new to this, start with a shirt that has clearly placed hole positions and a collar that sits evenly when pressed.
Types of collar pins and quick comparisons
| Type | How it works | Pros | Cons | Best for |
|---|---|---|---|---|
| Traditional collar pin | Worn through two holes near the collar tips; the pin points forward, with a small cap or back piece behind the shirt | Simple, classic look; lifts collar by a few millimeters | Can leave marks or holes if misused; less secure on very soft fabrics | Formal business and events with well-fitting shirts |
| Collar bar | A short rod or bar passes through the holes and sits behind the collar | Very secure; keeps collar aligned even with movement | Requires precise hole placement; a touch more visible on close inspection | Sharp, minimalist pin replacement when holes aren’t ideal |
If your shirt doesn’t have suitable holes, a collar bar or a different collar-stay approach can be a better fit. Magnetic stays exist for casual applications, but they aren’t a true collar pin and read differently in the line of the collar.
Prerequisites before you wear collar pins

You need a dress shirt with two small, accessible holes near the tips of the collar. The fabric around these holes should be sturdy enough to hold a pin without fraying. Your collar should sit flat and maintain a clean edge when the pin is in place. If the shirt’s collar is overly soft or the holes are misaligned, you’ll struggle to get a balanced look.
Choose gear that matches your shirt. A traditional collar pin works best with a wider spread collar or a classic point collar, not a super-short point. If you have a slim tie knot, a collar pin that lifts by 2-4 mm tends to look most natural. If you’re wearing a suit that’s a touch more fashion-forward, a very subtle lift can still keep everything clean without feeling contrived.
A quick fit check helps: press the shirt flat, set the collar in its natural stance, and estimate the height you want the collar to rise. The goal is a crisp vertical edge that complements the tie, not a pin that pulls the collar out of shape or makes a lumpy line at the tie knot. Have a backup plan in case the holes aren’t perfectly aligned – be ready to switch to a standard collar bar if needed.
If you’re new, start with a traditional collar pin and move to a collar bar only if the holes or fabric aren’t cooperating.
Step-by-step guide to wearing collar pins
Start with a crisp shirt and a clean knot. Iron the collar edges so they lie flat and don’t bunch near the holes. View both holes clearly with the collar held open to align the pin evenly on both sides.
1) Choose the right shirt. Pick a shirt with clearly placed holes near each collar tip and a collar that lies flat when pressed. If the fabric is thin, choose a pin with a shorter length to minimize marks. If unsure, practice on an old shirt first.
2) Locate the holes. Find the two holes near each collar tip on the front-facing edge. They should line up evenly with the collar tips; if one hole sits higher, adjust the collar before proceeding.
3) Align the collar points. Bring the collar tips together so the holes are parallel and level. Check symmetry in a mirror.
4) Insert the pin from the front. Push the pin through the left hole, then the right, until it sits flush on the outer surface. The pin should disappear behind the collar fabric with a clean edge.
5) Secure with the back piece or cap. If you have a back stopper, snap or slide it into place behind the collar to prevent movement and poking.
6) Adjust the collar height and knot. Check how the collar sits against your neck and the knot’s silhouette. If the lift is too high or too low, reposition the pin or choose a different height.
7) Check symmetry and comfort. Stand naturally and look in the mirror. If one side reads higher, reseat the pin. Comfort matters; you should not feel pressure against neck or skin.
In practice, a common misstep is over-lifting the collar. A 2-4 mm lift reads as intentional but not fussy. If you have to pull your collar away from your neck all day, you need a shallower lift or a different pin arrangement. With time, you’ll sense the right height for your neck and suit. The key is symmetry and a clean edge around the tie knot.
In practice: two scenarios

Scenario A: Business formal with a navy suit. A crisp white shirt with a classic point collar; collar pins pull the tips together and lift the collar edge, creating a precise line that makes the knot look fixed and intentional. The effect is understated confidence, not flash.
Scenario B: Evening wedding with a charcoal suit. A touch of vintage flair without shouting. A slim tie with a modest knot and a traditional collar pin delivers a refined look. Ensure the holes sit evenly and the pin is centered for a balanced silhouette across both collar tips.
You’ll adjust subtle details: the height of the pin relative to the knot, the fold of the collar, and the fabric’s smoothness. If the pin catches on the fabric when you move, you might need a shorter pin or a different back piece. The goal is a quiet, deliberate line that enhances the outfit rather than drawing attention to the hardware.
Troubleshooting and common issues
- Pin won’t pass through the holes: Check for fabric snag or a misaligned hole. Gently widen with a fine needle if the holes feel tight, then reattempt with a smooth insert. Do not force the pin.
- Holes show wear or tears: Stop using the same holes if the fabric frays. Move to fresh aligned holes if possible, or switch to a collar bar.
- Pin slides during wear: Use the back stopper or cap; verify the cap is fully seated. If movement persists, shorten the pin or choose a more secure back piece.
- Tight collar knot feels odd: Lower the lift by 1 mm or adjust the knot size. A high lift can constrict the neck; a lighter lift reads more natural with most ties.
- Pin marks on skin or fabric: Lift less and reposition slightly lower; keep the pin on the inner flat plane away from folds. Use a softer underside collar if possible to reduce pressure.
- Incompatibility with shirt fibers: For very delicate fabrics, avoid a high lift. A delicate shirt can be damaged by any pin; choose a collar bar or skip pins for that garment.
Care, storage, and maintenance
Clean the pins with a soft cloth after wearing to remove sweat or oils. Store pins in a small, padded case to protect the tips and prevent scratches on delicate fabrics. Keep pins away from moisture to avoid corrosion, and avoid bending the pin or back piece. If you notice deformation, replace the pin to keep the line crisp. Regular checks on hole wear help you know when a shirt needs repair or retirement from collar pin wear.
Style notes: matching collars, ties, and proportions
A collar pin works best with shirts and suits that favor a lean silhouette. Pair with a medium to slim tie knot, such as a Half Windsor or a simple Four-in-Hand, to keep the knot compact and the line clean. Avoid overly wide collar spreads or very flamboyant knots, which can overwhelm the pin’s restrained lift. When in doubt, go for a neat, proportionate look where the collar’s edge and tie knot share the same vertical axis.
For minimalists, a collar pin is a powerful but quiet statement. For a bolder retro vibe, lift the collar a bit more and pair with a darker, high-contrast tie. The key is consistency: keep the lift, the knot, and the collar line aligned so the eye reads a straight, deliberate edge.
Next actions and buying guide
- Start with a reputable traditional collar pin set and a shirt you’re comfortable experimenting with. Expect a modest premium for quality metal and a durable back piece.
- When buying, look for a back stopper or cap included with the set. A secure back piece reduces movement and keeps the collar line crisp through hours of wear.
- Practice with an old shirt first. Dial in your lift and symmetry so you’re confident before wearing it on a real occasion. A few trials save embarrassment and fabric wear later.
Closing: collar pins are a precise tool for a sharp, vintage-inspired finish. With a well-pressed shirt, symmetric placement, and a restrained lift, you create a clean line that complements your knot and suit.
FAQ
Do collar pins work with every shirt?
Collar pins require a shirt with two small holes near the collar tips and a collar that can sit flat when pressed. If your shirt lacks holes or has a soft collar, a collar bar or alternative collar stays are a better fit.
How much lift should collar pins provide?
Aim for a lift of about 2-4 mm. Too much lift looks forced; too little is barely visible.
Can I wear collar pins with a casual outfit?
Yes, but keep the rest of the look simple. A clean white shirt with a slim tie and a tailored blazer reads as polished, not flashy.
How do I remove collar pins without damaging the shirt?
Gently pull the pin back from the front to release it, keeping the fabric taut to prevent tearing. If you have a back stopper, remove it first, then slide the pin out from the front.
Are collar pins expensive or difficult to source?
No. Good collar pins are affordable, typically priced modestly for a simple metal set. Look for stainless steel or brass options with a sturdy back piece for longevity.