
How To Use A Tie Collar Pin? A Step-by-step Approach
A tie collar pin anchors the knot to the shirt collar, reduces tugging, and keeps the knot centered so the tie line stays aligned from neck to chest. Set up with a flat collar, a standard knot, and a pin sized for light- to medium-weight fabrics. When done well, the effect is understated but unmistakable.
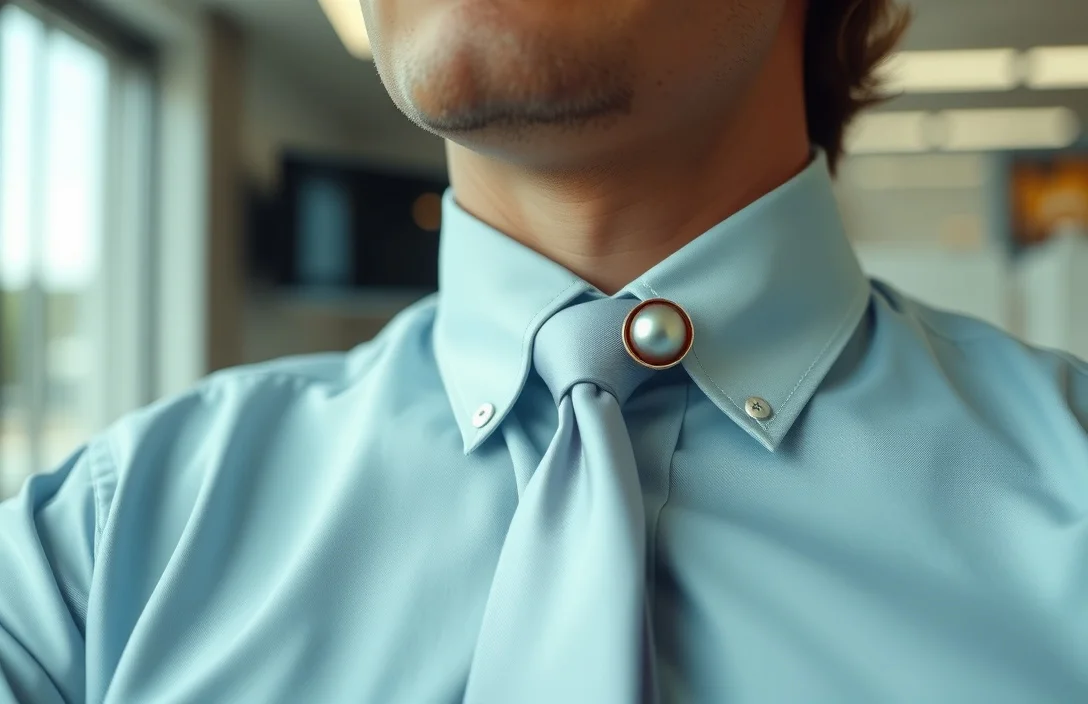
The pin threads through the tie and into the collar at roughly the third button height, holding the knot in place and preventing movement. This works best with a stiff, well-pressed shirt and a necktie that isn’t tied too tightly. If you’re new, start with a simple look before experimenting with decorative pins.
Key Takeaways
- Use a stiff, well-pressed shirt to reduce tilt and keep the pin aligned through the knot.
- Position the pin at roughly the third button height to balance knot and collar.
- Keep the pin parallel to the ground; a tilted pin looks sloppy and can poke.
- Don’t force through thick layers; back off if you feel resistance.
- Test comfort first; move your head gently after pinning to ensure it doesn’t poke your skin.
What a tie collar pin does

A tie collar pin pierces the tie and collar to lock the knot in place, preventing the tie from riding up when you lean or move and keeping the collar points aligned with the knot. Used correctly, the pin sits below the knot and above the tie’s surface and becomes visually invisible. In lightweight fabrics you’ll feel the pin less; the effect is more noticeable on thicker weaves.
Place the pin where the collar fabric overlaps the tie, not against skin. The back piece or cap keeps the pin secure so it can’t slide out. A properly chosen pin lies flat and doesn’t create a sharp edge that digs into the neck or jawline. If the pin feels uncomfortable or leaves visible holes, reassess fabric weight and pin type.
The method works best with a classic four-in-hand or half-Windsor knot and a shirt collar with a clean edge and moderate stiffness. It’s not universal; test on a spare shirt first.
Prerequisites and gear you actually need
Start with a stable platform: a shirt collar that sits evenly and a tie with a straight, even width. Choose a pin whose length fits through the tie and the collar without bending fabric. A simple, non-locking pin suffices for most fabrics, but if your collar or tie is extra slippery, consider a locking-back variant for extra security. Keep a plain, lint-free cloth on hand to wipe sweat or oils before you pin.
The essential gear list is short but picking the right options matters. A stainless steel pin is durable and affordable; brass with a nickel finish looks cleaner and resists tarnish in most climates. For delicate fabrics, a lighter pin or decorative option can add style without bulk. If you frequently move between formal and semi-formal attire, having two or three pins of different weights helps match different shirt collars and tie fabrics.
Practical setup: press the shirt, lay the tie flat, and smooth out wrinkles around the collar. If you have removable collar stays, ensure they’re in place and symmetric. Check the knot’s height; you want the pin to thread through the tie and into the collar without pulling the fabric. Room temperature and dry conditions help prevent fabric from stiffening or sticking to the pin.
How to use a tie collar pin: step by

1) Put on your shirt and tie; let the knot sit comfortably and the collar lay flat.
2) Align the knot with the collar so the knot is centered and the blade is even. The pin should align with the collar layers, not against skin.
3) Find the entry point where the tie and collar overlap, around the height of the third button. Pierce both layers cleanly without snagging.
4) Gently push the pin through until it contacts the back fabric. Stop there.
5) Attach the back cap so the pin cannot back out, but ensure you can press the back comfortably.
6) Check alignment and comfort in a mirror; turn your head and nod to ensure the knot stays put and the collar remains even.
7) If needed, adjust: if the pin shows above the knot, shift the knot slightly and recheck; never force through fabric.
8) Finish by smoothing the tie blade and collar; check for crookedness. If you notice wear after a few minutes, switch to a lighter pin or another method.
This sequence minimizes fabric stress and keeps the look clean. If you’re wearing a very stiff collar, you can insert the pin with a gentle wrist rock; for very silky or slippery ties, tilt the pin slightly to thread more easily, but keep it level once through.
Examples in practice
Attending a formal dinner with a restrained, classic appearance? A simple stainless steel tie collar pin at the third-button height keeps the knot centered without drawing attention. The result is quiet elegance: the tie sits perfectly, the collar stays tidy, and you look composed in photos.
For semi-formal events, a decorative pin can add personality without shouting. Choose a pin with a subtle enamel or muted finish to avoid overpowering the knot. You’ll gain a crisp line that reads well in person and in photos without feeling ostentatious.
what to choose, what to expect
| Type | Material | Pros | Cons | Typical Price |
|---|---|---|---|---|
| Classic pin | Stainless steel | Durable, low profile | Can snag delicate fabrics | $10-$20 |
| Decorative enamel | Brass with enamel | Subtle style; works with dark ties | More visible; slower to secure | $20-$40 |
| Locking pin | Steel with safety back | Stays put on active days | Slight extra bulk | $15-$30 |
| Collar bar (alternative) | Metal bar | Easy to adjust; strong feel | Not as discreet | $12-$25 |
| Lightweight/modern | Aluminum | Very light; minimal footprint | Less secure on thick collars | $8-$18 |
If you’re starting out, a basic stainless steel pin is a solid compromise between price, durability, and ease of use. If you alternate black and navy ties, a darker enamel option can be a stylish accent without shouting. For travel or fast-paced events, a locking-back pin offers extra security so you don’t have to re-pin during a long night.
Care and maintenance
Treat a tie collar pin like a small mechanical accessory. Wipe it with a clean cloth after wearing to remove oils and sweat, then store it in a small box or pouch to prevent scratches. Avoid leaving pins in direct sunlight for long periods, which can tarnish certain finishes. If a pin gets stuck or the back won’t seat properly, don’t force it; inspect the threading or try a different pin. Regularly check the collar itself for wear and tear; damaged fabric can snag the pin and cause more problems over time.
When you don’t wear a tie collar pin, keep it out of reach of children and away from magnetic surfaces that can attract metallic particles. For most fabrics, a mild cloth and fragrance-free soap are enough to clean the pin. If you see rust, replace it; corrosion can leave marks on the tie or collar.
Alternatives and when to skip it
A tie clip or clip-on tie is easier for beginners and can deliver a similar clean line with less risk to the fabric. If you have thin or delicate fabric, consider avoiding a pin entirely and sticking with a clip or a tie-bar that sits between the third and fourth button. For very formal occasions, a collar pin can feel a touch old-fashioned; pair it with a classic knot and a neutral tie to keep the overall look balanced.
If you’re unsure about collar compatibility, test on a spare shirt. Start with a simple, short knot and lightweight fabric to see how well the pin sits, and evaluate comfort after a five-minute movement test. You can also ask a tailoring professional to assess whether your collar has the right stiffness and spacing to support a pin.
Next actions: refine your setup and expand options
Purchase at least two pins: one plain stainless steel for daily wear and one decorative option for dressier occasions. Practice the pinning process in front of a mirror with a few knot heights to learn how your collar moves when you tilt your head. If you find the pin challenging, switch to a clip or collar bar that holds the knot in place without penetrating fabric. Finally, photograph your setup from multiple angles to verify symmetry in real life and in photos.
FAQ
How much does a tie collar pin typically cost?
A basic stainless steel pin usually runs $10 to $20; decorative variants and locking-back models range from $15 to $40. Prices vary by finish and brand.
How long does it take to pin a tie collar correctly?
Pinning correctly takes about 20 to 45 seconds once you’re practiced; the initial calibration may take longer as you learn the exact height and alignment.
Is it safe to use a tie collar pin on thin fabrics?
Thin fabrics can be prone to snagging; choose a lightweight pin and test on scraps first. If snagging occurs, switch to a clip or use a lighter pin.
How do you remove a tie collar pin without damaging the shirt?
Gently back the pin out in the reverse direction of insertion, then slide it completely out while supporting the collar with the other hand. Check the fabric for small holes and press the area if needed.
Are there better options than a pin for securing a tie?
Yes. A tie clip or collar bar can deliver a similar look with less fabric penetration, especially on delicate shirts or heavier ties. If you want a classic, low-profile effect, start with a plain tie clip.