How To Wear A Tie Pin Collar? In 7 Easy Steps
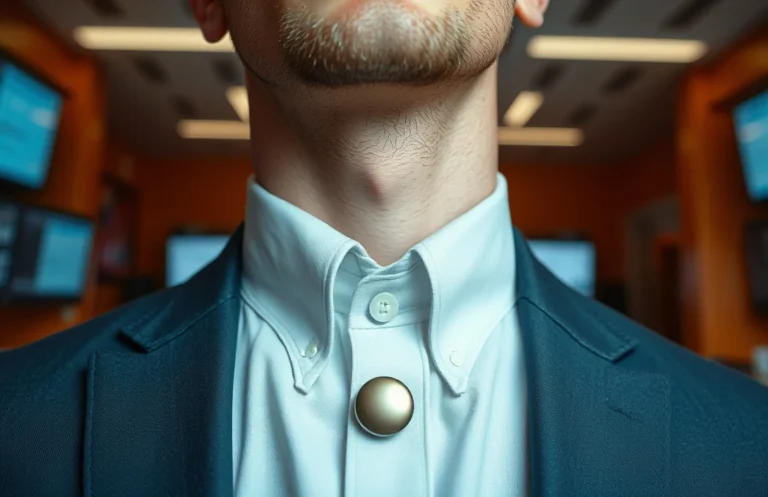
A tie pin collar adds polish and keeps the knot secure. Gather a stiff-collared shirt, a tie, and a tie pin designed for ties. The pin sits horizontally about halfway down the collar, between the 3rd and 4th button from the collar. When placed correctly, it holds the knot in place and the placket flat all day.
How to wear a tie pin collar

Place the pin horizontally through the tie and the shirt placket, typically between the third and fourth button from the collar, and align it with the sternum. Keep the pin level to prevent wobble, and ensure it rests above the knot.
- Placement matters. Place the pin horizontally between the third and fourth button from the collar.
- Pin safety. Use a pin with a protective cap to avoid accidental pokes.
- Tie width fit. Match the pin length to your tie width for a balanced look.
- Collar readiness. Start with a crisp, well-shaped collar that can accept a pin.
- Occasion choice. Reserve tie pins for formal or semi formal looks; skip for casual shirts.
What a tie pin collar is
A tie pin collar stabilizes the knot by pinning the tie to the shirt, keeping the knot neat and preventing movement. The pin passes through the tie and the shirt placket, not through the skin, to avoid injury. Use a pin with a safe end when possible. This signals deliberate, traditional polish when paired with a crisp dress shirt and suit.
Prerequisites and pre
Before you start, gather a properly pressed dress shirt with a stiff collar, a tie, and a tie pin designed for use with ties. Choose a pin with a smooth end or a protective cap to reduce risk. Make sure the shirt placket and tie are clean and wrinkle-free so the pin sits evenly.
What you’ll need

- A dress shirt with a stiff, well-constructed collar
- A standard necktie (mid-weight fabric works best)
- A tie pin designed for use with ties (prefer a pin with a safety end)
- A mirror for precise placement
How to wear a tie pin collar in 7
The following steps assume you already have your tie knotted. Follow each action deliberately to avoid pinning through skin or creating a lopsided look.
- Check collar alignment. Ensure the collar sits evenly around your neck and the knot is centered.
- Choose pin length. Pick a pin that is roughly the same width as your tie blade; too long or too short looks off.
- Align the tie and placket. Make sure the tie sits flat, and the shirt placket is straight.
- Thread the pin through the tie. Insert the pin horizontally, threading it through the tie blade and the front placket.
- Position at sternum height. The pin should sit around the middle of your chest, roughly between the 3rd and 4th button from the collar.
- Keep the pin level. It must stay perfectly horizontal; tilt or angling makes the pin noticeable and unstable.
- Secure and test. If your pin has a protective end, secure it; move the knot slightly and shake your shoulders to confirm it stays put.
In practice, you’ll want to practice this in front of a mirror a few times before wearing it in public. A well-fitted shirt collar helps – collars that bow or curl can cause the pin to ride up or slip. If your tie is particularly slippery, consider a pin that offers more surface friction or a tiny cap to reduce skin contact.
Choosing the right tie pin
Selecting the right tie pin isn’t just about length; you also need to consider your collar height, shirt fabric, and tie width. A low-profile pin works best on medium to skinny ties, while a thicker, heavier pin can overwhelm a delicate fabric. For most office environments, a simple silver or gold-tone pin with a smooth end provides a timeless, versatile look. Heavy or oversized pins can appear ostentatious on a standard dress shirt.
| Type | How it attaches | Pros | Cons | Best for |
|---|---|---|---|---|
| Tie pin | Horizontal pass through tie and placket | Classic look; secure hold | Can snag fabric; requires precise alignment | Formal business attire, traditional ensembles |
| Tie clip / bar | Clips onto the tie and shirt front | Quick to use; adjustable feel | Can obscure the knot; less formal | Business casual to formal, when a pin feels too fussy |
| Tie tack (pin with back) | Goes through tie with a backing | Very secure on light fabrics | Can leave small holes in the tie | Delicate fabrics, thinner ties |
Common mistakes and troubleshooting

Two mistakes derail the effect. Pinning too high crowds the knot or prints on the shirt. Angled or misaligned pins draw attention and can damage fabric. If you notice wobble, readjust the pin height and recheck the knot alignment.
- Too high, wrong height. Place the pin between the 3rd and 4th button from the collar to keep the knot and placket tidy.
- Angled pin. Level the pin precisely; a slight tilt is visible under light and hurts the look.
- Wrong length. A pin longer than the tie blade will protrude and create imbalance.
- No collar support. Use collars that sit flat and crisp; a soft collar makes the pin feel unstable.
- Movement during wear. Check movement by nodding and turning the head; if the pin shifts, re-seat and test again.
Variations and style tips
A tie pin is a studied touch, not a gimmick. For a modern take, choose a slim pin with a matte finish in steel or brass. A minimal pin reads as understated with white or pale blue shirts. Avoid loud metals or large pins on busy patterns. For a formal evening, pair a silver or gold-tone pin with a two-piece suit, a white shirt, and a solid tie.
Examples and practical setups
- Classic business formal: white shirt, navy solid tie, silver tie pin, crisp charcoal suit.
- Modern business casual: light blue shirt, heather gray knit tie, slim pin with a matte finish, navy blazer.
- Evening elegance: black shirt with a dark tie and a refined gold-tone pin for contrast.
Maintenance and care
Treat your tie pin like jewelry. Wipe it with a soft cloth after use, especially if it carries fingerprints or cosmetics. Store it in a small case or dedicated drawer to prevent scratches. Inspect the pin regularly for bends or burrs; replace if the tip no longer sits cleanly through the tie and placket.
Next actions
- Start with a crisp shirt and a standard width tie to practice.
- Pick a pin that matches your suit hardware (silver, gold, or brushed steel) and a safe-cap design to minimize skin contact.
- Practice in front of a mirror, repeating the exact placement until it becomes instinctive.
A practical verdict and next ste
Tie pins add quiet polish to classic dress codes. Start with a simple, safe pin and a crisp collar, then practice in front of a mirror until you can place the pin cleanly in under a minute. Your next step is to choose a pin that matches your preferred metal and test it with two or three different ties to see how the pin behaves across fabrics.
FAQ
How much time does it take to apply a tie pin collar correctly?
Applying a tie pin collar correctly typically takes 20 to 40 seconds once you know the steps, with practice reducing the time to 10-15 seconds for regular wear. Practice reduces time and ensures consistency.
Can I wear a tie pin collar with any shirt?
You can wear it with most stiff-collar dress shirts, but avoid very delicate fabrics or unlined collars that might crease or warp when the pin is added. Stiff collars give the best support for a pin.
Is a tie pin safe for skin?
Yes, when used with a pin that has a smooth end or protective cap; never push the pin through skin. Always use a pin designed for neckwear protection.
How do I prevent the pin from slipping?
Choose a pin length that matches your tie width, keep the pin horizontal, and ensure the placket and tie are flat. Horizontal alignment and proper length prevent slipping.
Are there alternatives to a tie pin?
Yes. A tie clip or tie bar can offer a similar stabilizing effect with a different aesthetic, often simpler to adjust. Clips offer speed and ease with a more contemporary look.